March 30, 2022 by Olivier Goffart
Porting the Slint UI Toolkit to a Microcontroller with 264K RAM 
Our vision with Slint as a cross-platform native UI toolkit is to provide user interfaces for any device. Initially we focused on running on desktop-class machines and embedded devices that support OpenGL ES. A few months ago we started porting Slint to microcontrollers (MCUs), and this blog post describes how we achieved that.
Goal: Our Printer Demo on a Raspberry Pi Pico
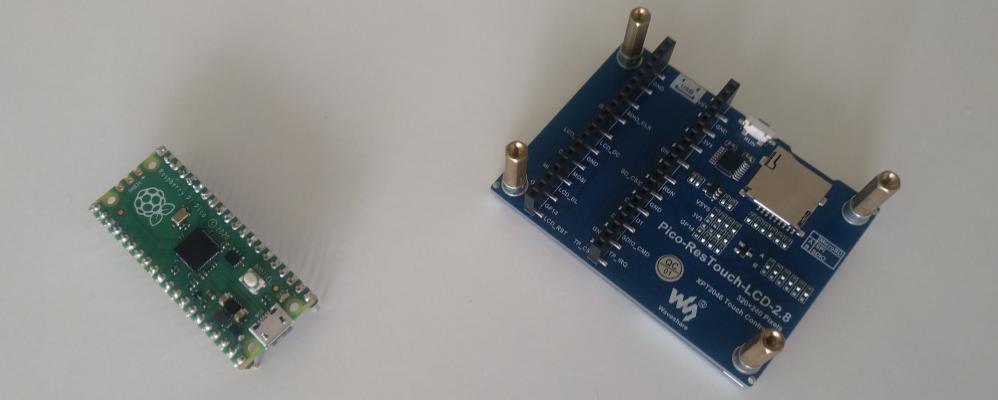
We chose the Raspberry Pi Pico as the first
board to support. It's equipped with Raspberry Pi's first self-made microcontroller, the RP2040,
a Cortex-M0 class processor, with 264KB of RAM and 2M of flash. This board is open-source-friendly and it costs less than 4€.
We attached the Waveshare Pico-ResTouch-LCD-2.8 to the Raspberry Pico board.
This is a 320x240 pixels 2.8" screen that connects the display and the touch screen over the same SPI
bus.
This hardware combination costs less than 20€ online, which provides a low barrier of entry
for enthusiasts and hobbyists.
We recognize that this is a fairly low-end MCU for GUIs, with constraints. We see this combination as a proof of viability for Slint:
If our demo runs on this board, then it could run on any MCU.
Based on this video, it's safe to say that we succeeded. 🎉
#![no_std]
We're working on what is called bare metal: There is no operating system between us
and the hardware. Our runtime is written entirely in Rust, which requires using the
#![no_std]
attribute to run on bare metal. This attribute
disables the Rust Standard Library which requires an operating system. Even if we tried to enable it, the Standard
Library is not available for the thumbv6m-none-eabi target, which the RP2040 uses.
The first step was to compile our core library for thumbv6m-none-eabi.
We needed to gate anything that used the Standard Library behind a "std" feature gate.
Thankfully, we're not using much of standard library, and we had already established the habit of using
core:: instead of std:: for types from the Rust Core Library. All types
that require memory allocation are in the alloc crate, so we had to introduce that in a few places.
The most complicated part was code that requires the thread_local! macro.
With the help of this macro we store some global variables. We had to resort to unsafe static
instead when not using std. This is a bit annoying, but unfortunately we couldn't come up with a better alternative.
Then we hit the problem that the architecture has neither atomic compare and swap instructions nor
a hardware floating point unit. This means that the Rust Core Library disables some features of the
atomic module, which are used by crates we depend on. So in addition to making sure that each of our
dependencies supports #![no_std], we also needed to make some of them use the
atomic_polyfill crate to work around the missing atomic functionality.
For the lack of hardware floating point support, we use the libm crate
(via num-traits), which provides software floating point support for
the operations that we use.
Hardware Abstraction
So far we've dealt with general issues that apply to all constrained embedded environments. The RP2040 microcontroller that we're starting with is placed on the Pico board, but there are other boards available as well with the same chip. Some are equipped with additional peripherals such as LEDs or more flash storage. An operating system typically provides drivers for the boards and peripherals, and provides an abstraction over those combinations to applications. We do not have an operating system to do that for us, but we do not have to start from scratch either: Fortunately the Rust ecosystem provides crates that make it relatively easy to get started in these bare metal environments. We're using crates from the RP2040 rp2040-hal project, as well as helper crates from the Rust Embedded project.
Framebuffer?
264KB of RAM is not much memory. Typically, when a screen is connected directly to the memory, a framebuffer is used to store one full screen in memory. We would render into the framebuffer and blend the UI before passing it on to the display. Actually, we'd allocate two of them so that we can render into one while the other one is being displayed. But with 16-bit colors (two bytes per pixel), that's 240 × 280 × 2 = 134.4kB per framebuffer. That would be half of our available memory gone, or the whole of it if we want double-buffering which needs two framebuffers, leaving us with very little space for code implementing the actual UI.
We solved this with a different approach: The display has its own on-chip memory, which is big enough to represent the screen. We can write into that memory by sending commands over the SPI bus, that contain the address and the color. So, instead of rendering the whole screen into our own framebuffer, we've designed our software renderer to render a smaller part in a smaller buffer. We decided to render one line at a time, so we allocate two buffers, each the size of one line only. We can render one line into one buffer on the CPU and then use DMA to upload the pixels to the display. Indeed, the RP2040 has a few DMA units, capable of reading main memory and transmitting it over the SPI bus to peripherals, like the screen. This happens completely without any CPU involvement. We can instruct the CPU to render the next line while the first is still being sent to the screen.
Unfortunately, we do not support DMA yet. This is
challenging, because the DMA support for the RP2040 in Rust is still work in progress,
and support requires changes deep down in the driver. Currently, the driver we use for the screen only supports passing an iterator of pixels to draw. But
if we want to support DMA, we need to give it a specific &'static buffer. Since the screen driver owns the SPI pins,
we would need to fork it, or at least re-implement the part that sends control command. This is totally doable, but not something
we wanted to spend time on at this point.
Update: DMA support has now been implemented. The screen updates are now much faster, see this updated video
Line By Line Software Rendering
Microcontrollers typically don't come with a GPU that supports OpenGL. We had to create a software renderer that runs entirely on the CPU, dividing the rendering into the following steps:
- Visit the scene and create one or more primitive rendering commands for each item. For example, we have a primitive command to fill a rectangle with a color, or to blend a portion of an image to a certain location on the screen.
- Sort the commands by their y position.
- For each line, collect the commands that affect this line. This is done by merging the commands from the previous line that spans into the new line with the new commands in the y-sorted list of commands computed in the previous step.
- Draw each command into the buffer for the current line back to front.
On the Pico board we don't have a file system from which to load images or fonts. Therefore, the Slint compiler loads and pre-renders images and glyphs at compile time, and embeds them raw into the program binary.
Partial Rendering
Here's a breakdown of the cumulative times the individual steps take to render the entire scene of the printer demo:
| Step | Duration |
| Visit scene, create rendering commands & sort by y position | 55ms |
| Collect commands for current line | 7ms |
| Draw commands for current line into buffer | 59ms |
| Send pixels to the screen over SPI | 111ms |
The above table shows that most of the time is spent in uploading pixels over the SPI bus to the screen. Consequently, the fewer pixels we upload, the faster the screen updates. When an animation runs in one part of the screen, we do not want to re-render other parts of the screen that remain unchanged. Our property system allows us to find out, on a very detailed level, which items in the scene are changing. We determine their location on the screen and collect them as dirty regions. When drawing a new frame, we can then limit our efforts to the dirty regions and send only newly rendered pixels to the screen.
Panic Handler
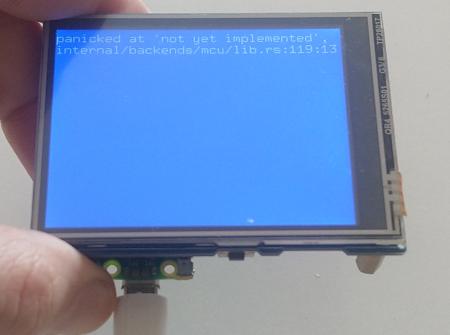
When Rust code panics, the default behavior is to stop the program with a message printed to the console explaining the reason.
With no_std there is no console and you need to manually set a panic handler function. Custom panic handlers are available on crates.io,
which can send the panic message over UART or defmt to your development machine. Since
we're connected to a screen, we thought we might use it and print the panic message there.
Our panic handler steals
the Peripherals object, and resets the screen state, before using a custom implementation of the
Write trait
to display the message on screen. Then we spin an infinite loop, until the user resets the device.
We used our Slint blue color as a background. Any resemblance with crash screens that you may have seen in other operating systems is purely coincidental. 🤣
Board Support and Customization
We strive to keep our examples, as well as your application code, as simple as possible, regardless whether
the target platform is a desktop system, a web browser, or now an MCU. This requires abstracting over
various differences such as the application entry point (fn main()), how the build system is invoked,
or for example combinations of supported peripherals installed on the board the MCU runs on.
For the boards that we support directly, we collect as much of the board specific code in our MCU crate. This is usually boilerplate code to initialize pins, power on peripherals, or screen drivers, which would otherwise be duplicated into each of our examples. However we recognize the need for customization. You might want to use Slint with a board that we're not familiar with. We want to provide a low-level API with traits, so that you can combine your own low-level device specific code with Slint. With these traits you can then provide the buffers for line-by-line pixel rendering, report the system time, and other hardware capabilities that we need.
Run it yourself
If you have a Pico with the screen that we're using, check out our README for instructions on how to run the code yourself.
What's next
At this point, our printer demo works on the Raspberry Pi Pico. This is proof that Slint runs on low-end devices. Next, we will port to another board, polish our APIs, and release a version of Slint that can be used directly from crates.io with MCUs.
Slint is a Rust-based toolkit for creating reactive and fluent user interfaces across a range of targets, from embedded devices with limited resources to powerful mobile devices and desktop machines. Supporting Android, Windows, Mac, Linux, and bare-metal systems, Slint features an easy-to-learn domain-specific language (DSL) that compiles into native code, optimizing for the target device's capabilities. It facilitates collaboration between designers and developers on shared projects and supports business logic development in Rust, C++, JavaScript, or Python.